

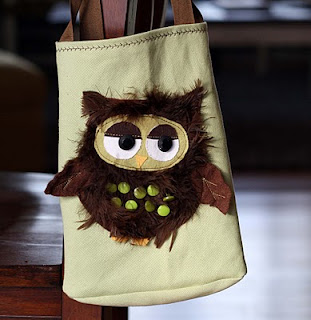
This gal Jessica at Running with Scissors has some really great craft ideas and I simply love her images. As I was rummaging around her site I discovered an image that just simply made me squeal! It was an cute fuzzy owl with bright, soft eyes and I fell in love. I had to know what it was. Well as I'm sure you know by the title, it was an applique for a tote. But this isn't just any Plain Jane applique, Jessica has added details upon details to make the owl fun and interesting.
Where's What You'll Need:
- Printed OWL APPLIQUE
- A plain tote bag
- Fusible Webbing - light weight bond
- Your choice of Fabric for each piece (felt/fleece works well, but it's your choice)
- Two black buttons for the eyes
- Optional: Brown craft feathers
- Optional: Buttons for body

Here's How to Do It:
- Print the Owl Applique pattern sheet and cut out each pattern. Trace them onto the fabric you will be using for each, then cut them out.
- If you like the detailed stitching shown on the Wings, then do so but it is not necessary.
- Sew the Wings to the Owl Body.
- Next create the Eyes by sewing the brown and white fabrics together. Do not add any buttons yet.
- Read the instructions that came with the Fusible Webbing.
- According to those instructions, fuse the Nose and Eyes to the Face. Then sew the Face to the Body.
- If you are planning on adding the craft feathers, Jessica recommends placing the feathers on the body and sewing down the center shaft in a zig zag. If you are not adding feathers, then move on!
- Add the eye buttons by hand-stitching them to the center of the eye ball.
- If you will be adding the green buttons to the Owl's belly, do the same as above on top of the feathers.
- Lastly, fuse the Body and Feet to the Tote Bag. And you're done!
Note: If you do not want to do any stitching or sewing at all, skip the feathers, buttons and extra stitched details! Just use Fusible Webbing to attach everything and cut-out small black circles for the eyes instead of buttons. You can even cut out green circles for the belly if you like that look.
0 comments:
Post a Comment