Showing posts with label Crafts. Show all posts

Handmade Wednesday: Scrapbooking with Fabric

Wednesday, March 9, 2011

I am a scrapbooking fool. You may not know this about me, but it is totally and entirely true. I have far too many books completed or ever on-going as well as an entire cabinet in my hallway filled (and I do mean filled) with supplies. Photographs make my heart flutter with excitement and I love putting the memories I create on pages to mull over on those days when life feels sad and overwhelming.

Now to the craft you came for! While I was looking for inspiration on turning my recent dull-drum pages into awakening breath, I came across something that I've seem before but never actually done: use fabric! I have not created these beauties yet myself, but I just thought I would pass them along to any of you other ladies (or gentlemen) who love scrappin' your memories and might need some creative encouragement to keep at it.


This page is from Elizabeth Kartchner from Dear Lizzy (who by the way is gorgeous!). As you can see she has a fabric strip stitched across the pager but the most wonderful bits of fabric on this page are the roses. Though you can purchase them at 2 Peas in a Bucket, I think I could make these little cuties myself.
  1. Take your fabric and cut a thin strip and twist.
  2. Roll your twisted fabric around in a spiral, making it look like the above picture.
  3. Use a glue gun to attach it together, then plop a button or a gem on top to finish!

This one is from EMI Scrapbooking. I loved it because it is simple and easy but will give your page a much desired lift in life. Obviously, you would need a piece of fabric with an embroidered image or words as they have with this lovely flower, but if you embroider yourself them go for it! Then you will need thread and green fabric strips as well as buttons and paper or fabric flowers.
  1. After attaching the pre-embroidered fabric on your page, move on to the flowers!
  2. Take some white or ivory embroidery thread and work a simple straight stitch down a piece of thin green fabric.
  3. Attach to your page.
  4. Stitch (or glue on) your flowers and buttons to the page and walla! You're done.
This last one is too easy for words. But I'll try. Thank Studio Calico for showing us how three simple pieces of uncoordinated fabric can turn your plain jane page into a fun surprise!
  1. Choose your fabric. Cut it to your desired length and width. Stitch it your page!
  2. Now you can stitch using a machine, but the Studio Calico ladies look as though they've just put a quick stitch at either end of each fabric piece.
Have fun scrappin'!!

Handmade Wednesday: Fabric Bookmark

Wednesday, March 2, 2011

Well, the day has finally come. Perhaps you guessed it. The day when I actually came up with a craft and made it myself! And here I am sharing it with you. How fabulously creative of me. I have always been a rather crafty person but have lacked the time and financial resources to make my own wonderful concoctions. So, I hope though I have not -in the past- been making the crafts I share here, that you can find it in your heart to forgive me and follow me as I begin a new journey of creating pretty things to inspire my life and yours.

This weeks handmade beauty was actually inspired! I have been in the mood for reading over the past few months. This is a new and noteworthy time in my life since I have never ever ever been a reader. Obviously, I can read so let's get that right out of your minds -I am writing here!! But as a child reading was so monotonous and boring to me that I just could not stand the thought of having to pick up a book. Even if it was suppose to be good. This terrible -in my opinion- habit has carried over well into my adult years. But as of late, this strange and insatiable desire has cause me to find myself at many a book store and library, wondering just what I was doing there. Okay, okay, so I'll get to the craft already. But I just had to preface this craft with a bit of a story. I am just so excited about this!!! Can't you tell? Needless to say I am reading and realized I have no bookmarks! I hate folding corners of pages if the book does not belong to me and so I decided to make one. And here it is:

I started with the only vintage-ish fabric I had, flipped it to the wrong side giving it a more worn appearance and cut two pieces for front and back. Cutting them 7' x 3' will give you room for sewing as well as a little edge when you're done. I also recommend using a piece of cardboard or sturdy poster board in between your fabric sheets to help the bookmark maintain it's sturdiness. I cut that piece to 6' x 2'.
I wanted a piece of fabric down the center of the bookmark for writing a word or just a little depth and color change. All I had was some ivory ribbon so that had to do! As you may notice in the picture, I sewed the two pieces of floral fabric together on one side. You don't have to do this to start, I just did so that I could be sure of the exact location my ribbon would go (based on the threading).
Next, I wanted to add a bit of interest to this bookmark of mine by adding a little more ribbon off to one side. I will be adding more detail below but wanted to make sure this pretty green thing stayed in place, so I hand stitched a quick thread through to attach it.
And here's that detail I promised you! I have a ton of silk flower arrangements that I never use and so I stole one itsy bitsy baby flower from one of them and took any plastic remnants off so that it would lie flat. Of course it was a tad tired looking and I have half a drawer full of buttons, so I thought one would be a nice touch. If you don't like the button idea, scrounge around your home for things you can use. Seriously! That junk drawer can be a crafters treasure trove.
This is just a photo of my sewing on the ol' machine. I threw it in here for fun and to see what my Finepix S1000 is capable of. Not much, unfortunately. I love photography and would die for a better camera! This one will have to do....
Lastly, you will probably want to add some sort of tab to your bookmark to help you open your book and see where you are. But it's not completely necessary. This is your bookmark and your craft. Be creative with it!
And walla! I wanted to do so much more, but with limited resources at home and a wallet that I've had to hide from myself in order to be able to pay the bills, this is what came out.
And right along side is the newest book I have been unraveling, Captivating. It is a book about women and who God created us to be. The Eldredge couple has written this book for anyone of any age and gender, for both sexes need to understand each other. I am only a few chapters in, but loving every page of it. I plan on passing it along to my husband Movie Star when I'm done. Then I'll pick up Wild at Heart (it' their book on men...) I am also considering blogging my way through this book because so many feelings and discoveries have been coming up. Would you all like that? Let me know.

Handmade Wednesday: Let Your Towels Talk!

Wednesday, February 16, 2011

This week, I decided to actually make the craft I wanted to talk about! What a novel idea. Sometimes I amaze myself. Anyway, my sister is adopting a baby which is due in less than two weeks and so they have had to get their remodeled home completely finished. The last thing they've been working on is their main bathroom. They decided to go with blue and white ..... now I could go into all the details about how they made it look just dandy, but perhaps I'll save that for another time. Right now, I'll just tell you about my project.

I wanted to give my sister and her husband something that they could put in the bathroom. I also wanted to give them a "Congrats on the Baby" gift. Nothing crazy, but just a little something. I thought about towels but they can be so impersonal (nothing to do with the baby). I decided to make something. And what do you know, a name on a towel came right to me! Making them for my blood sister made me want to make some for Bonnie too and this one here is for her eldest son Aiden. You can also stitch sayings like "Wash your hands!" or "I can tell" if you have kids who fake their hand washing after using the bathroom..... might have to try this.


Here's What You'll Need:
  • Plain towels
  • Embroidery thread in your choice of color
  • Embroidery needle
  • The ability to do a back stitch (watch the video below if you don't know... it's easy)

Here's How To Do It:
  • Lay out your towel and lightly pencil the name or words you will be stitching (this will make it easier to stitch)
  • Pull however many embroidery threads you want to use and thread your needle (easy thread separating video)
  • Begin your needle work and use the backstitch!

The Mason Jar: A Versatile Wonder

Tuesday, February 15, 2011

I have always loved creating interesting lighting in and outside of my home. And here is my story of discovering something new for myself.

Recently I was at the 99 cent store (yes folks, you can find things you need or want there) walking down the dish aisle. I glanced at cups and picked up a few plates, but nothing struck my fancy. Then all of the sudden, out of the corner of my eye, there they were: Mason Jars. My heart lit up! I have one mason jar at home which I use as a vase, but to find 15-20 jars just sitting there, waiting to be taken home by little old me was trilling. I wanted to fill my cart with them but before I could do that, I needed to know "Just what am I going to use these for?"

Image: Ruby Press
Slowly and sadly, I walked away from the jars quietly praying they would still be there in a few days. I had thought of just buying them and deciding what to use them for later, but over the last few years (where money has been tighter than bark on a tree) I have had to be cautious of over spending. "Just buy what you know you need right now," I have to tell myself. It's a pressure..... Anyway, I came home and searched the internet. Here's what I found!

Image: Beth Helmstetter
Making this seems like a piece of work, but with the tips I found at asubtlerevelry.com, it may not be as hard as it looks. Just grab your buff man or that handsome guy next door you've been dying to talk to. Trust me, if he's at all interested in you, he'll be all too happy to help and show of his muscles. In additon to those rough hands, you'll need a large piece of wood, mason jars, tea lights and heavy rope. Then all you have to do is cut holes in the wood (that's where the handsome man comes in), put the tea lights in the mason jars, slip the jars into the wooden holes and tie on the rope. Classic and simply gorgeous!

For more Mason Jar lighting tips, head to Design*Sponge one of the sites on our blogroll.

Image: Print Nest
Oh my..... Use mason jars for craft storage? Yes please. After staring at this photo and trying figure out just how they did it, I stopped (cause I was getting nowhere) and asked Movie Star. Outside of his name, he is also quite a handy fellow. He told me they just screwed in a clamp. A what? If you are as daft as me when it comes to stuff like this, here are two options you can try at Home Depot. If you use a 2-Hole Clamp it's pretty obvious how you screw it to the wall. If you use Stainless Steal Clamps, Movie Star said that it would be screwed behind the mason jar and then tightened in the front.

Image: Paul Johnson
I am going to be 100% honest with you right now: This is my favorite idea and the one I'm going to do. I have alway loved pictures and this seems like a cool, vintage way to display them all over!

Needless to say, I'm going back to that good ol' 99 cent store to pick out my mason jars. Have fun with yours!

Handmade Wednesday: Owl Applique Tote

Wednesday, February 2, 2011

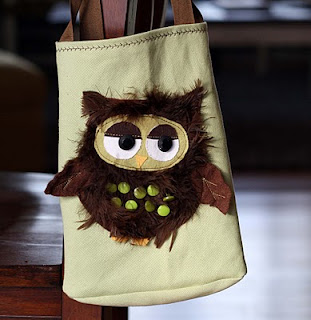
This gal Jessica at Running with Scissors has some really great craft ideas and I simply love her images. As I was rummaging around her site I discovered an image that just simply made me squeal! It was an cute fuzzy owl with bright, soft eyes and I fell in love. I had to know what it was. Well as I'm sure you know by the title, it was an applique for a tote. But this isn't just any Plain Jane applique, Jessica has added details upon details to make the owl fun and interesting.


Where's What You'll Need:
  • Printed OWL APPLIQUE
  • A plain tote bag
  • Fusible Webbing - light weight bond
  • Your choice of Fabric for each piece (felt/fleece works well, but it's your choice)
  • Two black buttons for the eyes
  • Optional: Brown craft feathers
  • Optional: Buttons for body

Here's How to Do It:
  1. Print the Owl Applique pattern sheet and cut out each pattern. Trace them onto the fabric you will be using for each, then cut them out.
  2. If you like the detailed stitching shown on the Wings, then do so but it is not necessary.
  3. Sew the Wings to the Owl Body.
  4. Next create the Eyes by sewing the brown and white fabrics together. Do not add any buttons yet.
  5. Read the instructions that came with the Fusible Webbing.
  6. According to those instructions, fuse the Nose and Eyes to the Face. Then sew the Face to the Body.
  7. If you are planning on adding the craft feathers, Jessica recommends placing the feathers on the body and sewing down the center shaft in a zig zag. If you are not adding feathers, then move on!
  8. Add the eye buttons by hand-stitching them to the center of the eye ball.
  9. If you will be adding the green buttons to the Owl's belly, do the same as above on top of the feathers.
  10. Lastly, fuse the Body and Feet to the Tote Bag. And you're done!
Note: If you do not want to do any stitching or sewing at all, skip the feathers, buttons and extra stitched details! Just use Fusible Webbing to attach everything and cut-out small black circles for the eyes instead of buttons. You can even cut out green circles for the belly if you like that look.

Handmade Wednesday's: The Bathroom Decoupage

Wednesday, January 26, 2011

Sometimes in a girls life, she wants a bathroom filled with pretty things. But it can be rather hard to find bath accessories that completely suit your personality or fit your bathroom style and coloring. I know that I have had the hardest time because I want all of my bath pieces to be in the same style, but not be too matchy-matchy. That's where creating your own design comes in rather handy. I love using decoupage to turn every cup, bottle, canister or shaker box into something beautiful and unique. If you're not familiar with decoupage that's alright! It is the art of decorating something using cut-outs of paper, linoleum, plastic or any flat material.

Of course you can always use any of the above materials for our craft today, but I love the idea of using napkins. They come in all sorts of interesting designs to give you the style you desire. Heck you can choose anything from vintage roses to children's rubber ducks! So, let's get started.


Here's What You'll Need:
  • Your container of choice
  • Rubbing alcohol or vinegar
  • Creamy colored acrylic craft paint
  • Paint brush or foam brush
  • Paper Napkin of choice
  • weather proof clear coat
  • Fine, sharp scissors
Here's How to Make it:
  1. Clean the glass jar with the rubbing alcohol or vinegar to help the paint adhere.
  2. Paint the jar with two coats of the craft paint and let it dry.
  3. Use the scissors to cut out the designs you want to use, separating the napkin layers so that you are working with only one thin layer.
  4. Then decide where you want them on your container by messing around with placement
  5. Paint the clear coat on the area of the container where you will be placing the decoupage, then carefully place the napkin design over it.
  6. Smooth gently to eliminate wrinkles.
  7. Finish with one or two layers of the clear coat.

Handmade Wednesday's: Dryer Fragrance Sachets

Wednesday, January 19, 2011

While I am always looking for great crafts, I came upon a gem: CraftBits. They were loaded with really great ideas and this was one of them. So if you are ever tired of buying new dryer sheets all the time and being wasteful, try making your own dryer sachet. When you place it into the dryer the fragrance will come wafting through and penetrate through all your clothes. It's so easy!

What You'll Need:

  • Cotton Fabric (your choice)
  • Sheet wadding
  • Lavender seeds
  • Fragrance oil or Essential oil (your choice)- consider Lavender and Lemon

Here's How to Make it:

  • Start by cutting out what size pads you want , approx. 5cm X 5cm is suitable.
  • Cut your fabric into the size you require allowing for stitching.
  • Sew 3 sides of your fabric closed and slip in the sheet wadding through the last opening.
  • You will need to either begin hand sewing or machine sewing this end closed.
  • Just before you complete the closure Sprinkle some lavender oil into the Project or sprinkle your drops of oil onto the wadding prior to placing it inside.
  • And when the fragrance decreases add some more drops of oil !
  • You can use essential or fragrant oils for these mat's, Fragrant oil is much cheaper and can be bought from good craft supply stores.

Here's another way:

  • Instead of putting wadding in, load it the bag with lavender seeds
  • Now, if you are not crafty or just don't have time to make these, you can find them on Etsy too!

Handmade Wednesday's: Cookie Tin Doilies

Wednesday, January 12, 2011

Just because it is January and the Christmas season is over doesn't mean you have stopped baking right? Right? Well, maybe you have. But I know that there have been many years where I have baked and baked only to find the season over, my waistline larger and my stomach hungrier to more. Plus, I just love to bake cookies! So, if you are feeling as I have and want to share your newly baked goods with friends, family and neighbors you may be looking for something pretty to put them in that isn't too Christmasy. Completely got you covered! Though I am a crafty lady and would love to take credit for this idea, I sadly can not. It's the ever clever Martha. Here we've explained how she makes doily labels to dress up your cookie tins!

Doily Tin How-To:

  1. Download desired doily-tin clip art, below. Or scan your own doilies!
  2. Using a photo-editing program, adjust image size as needed to fit the lid of your tin.
  3. Using an ink-jet printer, print image onto a clear, full-sheet label; cut out, leaving an 1/8-inch border. Center printout on lid.
  4. Holding top half in place, remove paper backing from bottom half. Smooth from center to affix to lid.
  5. Remove backing from top half; smooth to affix label completely.

Doily Tin Downloads from MarthaStewart.com:

Red


Blue


Green

Christmas Decor: Clever Ways to Display Those Cards

Sunday, December 19, 2010

Seeing as how it is a week until Christmas, I am sure you have been receiving cards by the basketfuls from friends and family wishing you a "Merry Christmas", a "Happy Holiday's" and a "Happy New Year". I know I have, and they all look so beautiful. I'm always trying to come up with new and practical ways to display Christmas cards so that I can look at them as well as use them to decorate my home for the holidays. If you are in the same boat as me, welcome! Not only is there room on this boat, but there are also many ideas splashing on board from the vast sea known as the internet. Check out what I've discovered and please use them for your cards too!

Better Homes and Gardens shows us a great way to place those cards on the mantel with decorative ease. Pick up some wire garden edging (used to border flowerbeds) and tuck your cards into the arches. The great thing about this idea is that the edging is so easy to decorate and bring into your christmas decor. Add some ribbon, tree trimmings and garland. Even adding some hanging ornaments to your garland will give the mantel the finishing holiday touch it needs.

If you're not one who receives many cards, this idea may be best for you. Again, Better Homes and Gardens suggests placing evergreen branches placed in a metal urn or short vase. Set the cards in the branches. To add a little more intrigue to the set, pick branches with pine cones still intact, attach pine cones or small ornaments to floral wire and then stick them in the vase.

I know many folks who struggle with creative decorations and just want some simple easy ideas. Well, here's one! Set a basket on your table and when a card comes just set inside! Now when your friends and family are over, watching you cook, they can sift through the cards in holiday enjoyment!

The gal from Shorely Chic has some great christmas card display ideas as well, one of which I am a huge fan of. Hang Christmas cards from your staircase! So beautiful. With this idea, you would attach clothes pins to the hand rail on your staircase, which you can hide or enhance with garland.

My favorite way to display your cards is by placing them on hanging ribbon. I first saw this idea at my sisters house and fell in love! She had taken 2 long ribbon strands and sewn stitches every so often to create little slits for the cards to slide into. She hung them from the sides of her fireplace. In this case, it seems as though buttons were sewn onto the ribbon with a paperclip type product hung over the button. Then you can use the other end to attach your card securely. But you can also use clothes pins or tape to achieve a similar affect.

Lastly, there are a few wire card holders that you can buy to hang on your wall. They aren't overly inexpensive, but they are easy!

DIY: Make Your Own Snow Globe

Friday, December 17, 2010

This is one of the simplest and cutest things you can make for Christmas time. If you're looking to for a fun activity for your kids when they're out of school, this is perfect. And, it will last for years to come.

You'll need:

a jar of your choosing with lid
anti-rust sealant (for metal lids)
clear epoxy or hot glue or aquarium sealing glue or florist clay
mineral oil or baby oil
eggs shells or large white/silver glitter flakes
a figurine/decorations of your choice


Instructions:

1.) Glue the figurine inside the jar. You can glue it to the bottom of the jar or the lid. It usually looks much better if you glue it to the lid.
2.) When the glue has dried, pour the mineral oil/baby oil into the jar.
3.) Add the snowflakes. If you use egg shells, simply roll a roll pin over the egg shells until you have tiny pieces. If you use glitter, just add as much as you want.
4.) Screw on your lid very tightly. Use the anti-rust sealant when screwing on lid, if using a metal lid.

If you want to make your snow globe a little unique, use other decorations inside and out. You can also use jewelry. Simply glue only one part of the jewelry to the base of the snow globe. It's a cool option, because it's a little different and it will move with the snowflakes.
For the outside of the jar, you can decorate it will paint, more glitter and ribbons. Tie a cute Christmas ribbon around the lid to cover the lid and make it very Christmasy. And since you already had clear glue, use it to add some glitter to the sides, or break out the paintbrushes. Enjoy this activity now and years to come!


Inspired by elfster.com, but with IP touches

Christmas Decor: Using Ornaments

Tuesday, November 30, 2010

Whenever this time of year comes a callin' I begin to get excited. I bust out my boxes of decorations, lights and garland. This year I began sifting through what I've truly been using and what it just simply clutter. Once I organized it all, I made a box for the Goodwill and then looked at what was left over for my home. It wasn't much. I've realized that though I have 3 strings of garland, tree ornaments, a nativity scene, decorative candles, wreaths and lights galore I didn't really have any semblance of order or style to my adornment. So, I went to a few stores searching for any kind of idea. And then it hit me: use ornaments all over to tie it all together! It was like that light bulb just went "ding!" inside my head. So, if you want to use this concept for your home christmas decorations, here are a few great ways to string your ornaments together.

  • Of course you'll use them on your tree, so if you're planning on doing an ornament theme all around the home make sure the round ornaments on the tree are in the same color scheme or design as the one's you will be using all over.
  • Create a beautiful centerpiece on a table - or anywhere really - with a few pillar candles gathered together on a plate while round varied ornaments, jewelry, and frosty snow surround them.
  • I have a tall, thin vase and love to fill it with items for every season. In the the fall or winter I usually place discarded christmas tree branches, fall leaves and pine cones inside. But this year I've decided to use ornaments too! You don't want this to come across too orderly so the it's best to use at least three items (branches, berries, roses etc.) and different sized ornaments to complete the ensemble.
  • My parents have a grand staircase and my mother always wraps garland around the railing at Christmas time. The past few years she has hung gorgeous ornaments from the garland with pretty, soft ribbon in varied lengths for depth. She just tied the ribbon to the garland or rail, but you can also attach the ribbon to an ornament hook and hang the hook on the garland. It's always classically beautiful.
  • And don't forget about the bannister! This is the place where you want to start off your staircase decor with flair. If you hang a few large pine branches, hooked to the bannister in floral wire and gather several ornaments in varied sizes and colors in front that cascade down towards the floor, you will wow anyone who begins a journey up the fabulous staircase.
  • And speaking of ornaments attached to ribbon, there are many other options for this duo that you're home will just love! Just wrap an embellishing ribbon around hanging towels and tie a knot. Then attach an ornament with a piece of wire or ornament hook wrapped around the knot. This looks especially fantastic on the backs of dining room chairs! Better Homes and Gardens suggests draping a pretty towel, large napkin, lovely scarf or any other fabric over the chair and then proceed with the above instructions.
  • If you plan on using the dining room chair suggestion, top of the table look with ornament place cards and napkin rings. For the place cards, just adhere a small embellished piece of paper with your guests name on it to the ornament. For the napkin ring, attach an ornament or two to ribbon and tie it around a rolled up napkin.
  • Ornaments also look great atop candle sticks. They don't even have to be matching candle sticks as long as they have the same look and style. This idea works great with varied heights. Simply gorgeous!

Friday's Fab Etsy Finds: Knitted Accessories

Friday, November 19, 2010

Brrrrrr!  The cold weather is upon us and I don't know about you, but I need knitted accessories.  During this time of year I love to throw a scarf around my neck adding just a bit of flare.  Or a hat on my head to keep me warm and cozy.  Even a pretty knitted sweater will do, but I never thought of throwing something knitted around my coffee cup!  Heading to the ever fabulous Etsy, I discovered some knitted wonders that make want to jump in the snow just so I have a reason to shop.


I'll start with the knitted coffee cup sleeve I just mentioned.  When I saw this, I almost died!  I love coffee and now I can have warm - but not scorched - hands and be fashionable while holding it.  Just amazing.  And for only $12 this is the perfect Christmas gift or stocking stuffer.


Of course, I am a hat girl.  They just look good on me and so I'm always in search of new a classic trends.  When I discovered a knitted flapper hat I thought, "I can be warm and trendy?  Yay!"  Though this is a bit expensive for my taste at $38, I believe having a warm and pretty head is well worth it.


Didn't you know that knitted bracelets are all the rage this season?  Well they are.  And this particular company is having an amazing deal right now.  You get three of these little beauties for only $20.  I'm ready to be head to toe full of knit!


And speaking of toes, crochet slippers can seriously be yours if you know anything about knitting.  Spend just $5 and you can make slippers for yourself and everyone in your family!  I am crazy about this idea.

Handmade Wednesdays: Thanksgiving Napkin Rings

Wednesday, November 17, 2010

Sorry for neglecting my Handmade Wednesday Crafts for the past couple of months. But they have now returned! While looking through my Martha Stewart's Encyclopedia of Crafts for a project I could tackle this week, I stubbled upon these napkin rings which I knew would make any Thanksgiving table pretty next week. So, thank you Martha!

Acorn Napkin Ring

What You'll Need:
  • Oak leaves
  • Glycerin (available at drugstores)
  • Water
  • Rotary tool
  • 1/16 inch drill bit
  • 16 inch length of gauge wire
  • matching acorn nuts and caps
  • Wood glue
  • Brown floral tape
  • Brown seam binding
To preserve oak leaves, mix 1 part glycerin in 2 parts hot water, and let the leaves soak in the mixture for about 2 days. Then hang them to dry on a clothesline for around 5 days. To make the napkin rings, start by drilling two 1/16 inch holes through 2 acorn caps. Insert one end of a 16 inch length of a 22 gauge wire into each one; bend the wire and twist. Attach nuts to the caps with wood glue. Attach wire to the end of the leaves. Wrap wires with floral tape. Wrap leaf wire and 1 acorn wire together with brown floral tape, stretching the tape as you wrap it tightly. Repeat with the other acorn wire, facing in the opposite direction. Wrap wires with brown seam binding. Glue at each end. Bend into a ring and put napkin inside.

Falling for Home Decor

Tuesday, October 26, 2010

Though Fall is amongst us and you may have already decorated your home for this cool season, there still may be a few of you out there who did not have that decorating itch until now. I scratched that itch back in early October but only by displaying my Halloween decor. So, now that Halloween is only a week away and I will want to change the look and feel of my home, I began to scour the internet for classic and simple Fall adornment. Plus, I just think these images are pretty!

I really wish I had a fireplace because they keep you warm, but they are also a focal point in a room which allows you to showcase each seasons decorating trends. I am also a fan of creating a mini pumpkin patch with all sizes of pumpkins, gourds, squashes. The fireplace is the perfect location to exhibit this pumpkin collection! And like shown above, you can make it stand out even more with a bit of lighting and sparkling branches.

Since I've just mentioned branches, I will go into a little more detail about them. Fall is the time when nature begins to dry out and die. Sounds dreary, I know. But it can also make for beautiful vase arrangements. Consider plucking a few long, bare branches from a tree nearby and place them in a gorgeous vase. In order to give an appeal in this arrangement you must have a vase with at least, a bit of interest. But this route may not suite you, so my other suggestion is to find branches with a few sparse small flowers or dead/dying berries in fall colors to gather together for a luscious bouquet.

Candles are warm, inviting, usually smell lovely and their soft glowing light makes you - and your guests - feel cozy and relaxed. You can place candles anywhere in your home this fall, but I love to see candles in interesting centerpieces or grouped together for an alluring scene. You can place then on a table or shelf with fall leaves, branches and dried flowers surrounding it, or use levels. Gather together candles in different heights or place a candle on a tall platter with smaller candles around it.

And who doesn't love filling clear cylinders and bowls with you favorite fall fruits and vegetables? I know I really enjoy seeing them! In the above photo, you see different colored pumpkins, gourds ad squashes, but there are other options to filling your cylinders. Try using fall fruits and vegetables like apples, pears and indian corn. But acorns and sweet gum tree balls give an exceptional fall feel as well.

Quick Halloween Costumes

Sunday, October 24, 2010

Halloween is quickly approaching and if you are one of the indecisive individuals (like me), you still don’t know what you will be for Halloween. And if you’re above wearing trashy costumes, then last minute eye-catching costumes are difficult to find. Luckily, I have a few ideas for you lovely ladies :) There are a few ideas for only you and a some more couple costumes if you’ve convinced your boyfriend/husband to join in.

A simple classic for either a guy or girl is the nerd costume. Root through your closet for clothes about 2 sizes too small and make sure they don’t match. Wear a button-up shirt (every button buttoned) and get a pair of suspenders and very out of date shoes. Of course you must have glasses taped in the middle and complete with neck strap. To enhance the costume, you can use a pocket protector (full of pens), add fake zits to your face and use gel to mold your hair into some strange hairdo. This idea is an oldie but always a goodie.

A funny ensemble that also never goes out of style is the bag lady. Simply wear a skirt a flowing skirt with men’s longjohns underneath. Then, wear several different types of shirts layered in random order. It’s better if some of the them are dirty and/or ripped. Next, wear two different shoes, such as a men’s work boot and a women’s flat. Next, wear one glove with cut off finger holes on one hand and carry a plastic bag with a few bottles and cans in it. Lastly, use make up to dirty yourself up a bit, make your hair messy and wear a tattered hat of any kind.

A newer and underdone idea is the Orbit gum girl. Dress entirely in white, including a barrette. The only color in the outfit is a bright airy scarf of any color around the neck. A blonde wig will enhance the outfit. Lastly, speak with a British accent and use phrases such as ‘fabulous’ and ‘for a fresh clean feeling, no matter what’. Also, having Orbit gum to hand out is handy ;)

A simple yet brilliant costume is the stick figure. Get a black long sleeve shirt and black athletic pants. Next, glue glow sticks along the arms, legs and spine on the front and back of the outfit. This is an easy and unique outfit that will never go out style.

A cute and retro costume is the famous Charlie Brown ghost costume. Take a plain white sheet and cut about 20 holes in it. Make sure two of the holes are for your eyes. Then carry around a trick-or-treat bag full of rocks. This is a sweet throwback that will bring a smile to anyone’s face.

The easiest and cheapest costume is the Got Milk? Ensemble. Write ‘Got Milk?’ in black sharpie across a white t-shirt and put a milk mustache on your upper lip with Halloween make up. If you are willing to put in a little more effort, you can carry around a milk quart as well.

If your boyfriend/husband is game to dress up with you, here are a few ideas that he will probably go for. A superb retro outfit is Popeye and Olive Oyl. Each outfit can be made with some sewing and trips to the thrift store and army supply store. You can also buy them around $20-$30 each. Just remember that this costume isn’t complete without a can of spinach :)

A great and rarely done idea is Thing 1 and Thing 2 from The Cat in the Hat. These can also be made with some skillful sewing and of course blue wigs. They are also sold many place for around $30 each. To enhance the costume, you can paint your faces white. The great thing about this costume is that it gives you an excuse to act as goofy as you want.

Outfits perfect for Halloween are Morticia and Gomez Addams. They are romantic and creepy (and all together spooky). The man needs a black pinstripe suite a red tie. To complete his ensemble, make his hair black, add a pencil mustache and a cigar. For Morticia, wear a tight black dress with flared ends at the hands and feet. Wear heavy eye makeup and dark red lipstick and long straight black hair. If you can, polish this costume with the accents and demeanor Gomez and Morticia to make the costumes all the better :)

My last and favorite costume is the sailor kissing the nurse in Times Square from Victory in Japan from World War II. A great thing about this one is that it is very simple to recreate. All you need is a sailor uniform and nurse uniform, which are common. It’s easy to rent/buy the outfits or to gather up parts for the ensembles from random places. The best part is that these costumes make for great pictures, and when people ask who you are, just reenact the kiss!

Now you have just enough time before Halloween and a few suggestions to make a spectacular costume. Enjoy your outfit hunting and the parties!